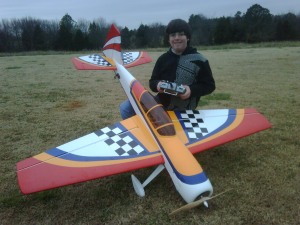
Daniel got an AeroWorks .90-1.20 Yak 54 ARF-QB for Christmas. Plenty of folks have asked me how we set this up – so I’d like to get this recorded here for future reference:
1.Plane
This is the plane: The AeroWork YAK 54 .90 to 1.20 – $379.95
http://aero-works.net/store/detail.aspx?ID=288
2.Servos
Brent recommended the following servos: Power-HD Digital Metal Gear
http://www.troybuiltmodels.com/items/HD-DS120MHV.html
Looking back I see I paid $28.99 each – at the time of this writing they are $35.99 each – you need QTY 5. One for each aileron, this plane has split elevator (2 servos), and then 1 for the rudder.
The key here is High Voltage because we are going to run this from a 2 cell lipo UNREGULATED – more on this later… The manual calls for minimum 140 in/oz Digital, Metal Gear – these servos are rated at 214 oz/in when run like we’re gonna run them (2 cell unregulated)
3. Motor
Turnigy AerodriveXp 90 SK Series 50-65 270Kv / 2100W – $39.99
http://hobbyking.com/hobbyking/store/uh_viewItem.asp?idProduct=7709
Bob Russell taught me this formula:
- floating around: 80 watts per pound
- Spirit Performance: 100+ watts per pound
- Acrobatic: 150+ watts per pound
- Very Strong Vertical: 200+ watts / pound
You want something in the 150 to 200 watts / pound range. AUW of our plane is in the 11-12 pound range 11.25 in my setup – we’re in the right neighborhood motor wise.
Its helpful to decode the numbers too – the 50-65 part means that the can diameter is 50mm and the 65 is the can length is 65 mm. a 50-65 fits just fine when mated with the proper motor mount. More on that later…
4. Motor Mount
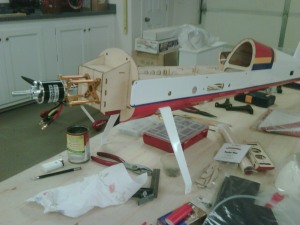
There is not one motor mount that works. You need to combine 2 mounts to get it right:
This motor mount has the right base plate for mating up to the motor and is also what you’ll use to mount to the firewall
http://hobbyking.com/hobbyking/store/uh_viewItem.asp?idProduct=5312 – $6.72
The length of the tubes connecting the plates together are the wrong length. I can’t remember if they are too short or too long i think they were too long – but you can’t just simply cut them to length
By sheer dumb luck I ordered the wrong motor mount – these tubes are the correct length that the screws between these 2 motor mounts are interchangable
http://hobbyking.com/hobbyking/store/uh_viewItem.asp?idProduct=5320 – $15.50
The down / right is engineered into the firewall. This means that you can mount the motor mount flat on the firewall. To do this, we used a drill and tap set and added threaded screw holes on the motor mount – we screwed the motor mount to the firewall from the inside of the plane. We used washers. Alternatively you should simply drill holes through the motor mount and use blind nuts on the back of the firewall. Some improvisation will be required to get the motor mounted to the firewall.
Funny that it takes over half the price of the motor to mount the motor to the plane.
If i were doing this again i would try this motor mount also
5. Speed Control
You need a 100A ESC. When you get to this size you don’t generally get a BESC included but thats ok because we will power the servos and receiver with the 2s lipo. This is what I am running:
http://hobbyking.com/hobbyking/store/uh_viewItem.asp?idProduct=4691 – $99.99
Since we did our build, Hobby King has released a new ESC that has a data logger built in – pretty cool. If I were doing this again I would use this ESC:
This is a 100A “Super Brain” and it’s even less expensive – I’d definitely use this ESC.
Here are some notes we took while performing the original setup
https://flyingelectric.wordpress.com/2009/12/20/added-about-7oz-of-shot/#comments
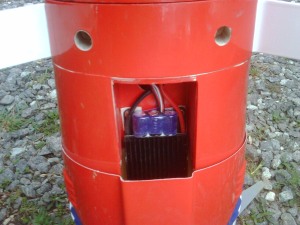
Here’s where we installed the ESC:
6. Batteries
We are running 2 x 4 cell 3700 mah 25c packs. We fly for 5 minutes. At the time I was shooting for lighter weight so we went with these 3700 mah packs. But after we were done building we realized that the CG was not right at we added about 7 oz to the cowl and glassed that in. If I knew that i was going ot be adding so much weight i would have rather than been battery weight – not lead. These are the batteries we are running
http://hobbyking.com/hobbyking/store/uh_viewItem.asp?idProduct=9338 – $42.22 each – 415 grams each
If I were doing this again here are the batteries I would use:
http://hobbyking.com/hobbyking/store/uh_viewItem.asp?idProduct=8584 – $37.01 each – 506 grams each (or around 200 grams or ~7 oz more) – should you give you for sure 6.5 minutes of safe flight compared to the 5 minutes we run
You also need a battery for the receiver and servos. We are running a 2S lipo unregulated on the Spektrum 7000 – here is what we are running
http://hobbyking.com/hobbyking/store/uh_viewItem.asp?idProduct=6519 – $7.54
We just rubber band this battery right on top of the series packs. After a 5 minute flight our FMA charger reports 85% charge remaining – so this 1300 mah battery is plenty big enough. If you need you can go smaller no problem (stay with 2S).
We have had at least 20 flights now with the 2S unregulated pack pluged directly into the battery port of the Spektrum 7000 receiver. The servos plug right into the receiver and run just fine on this higher voltage.
7. Prop
We’re swinging an APC 19 x 10 plastic prop from Hobby Stop. If I were ordering from Hobby King I would try the following props:
http://hobbyking.com/hobbyking/store/uh_viewItem.asp?idProduct=9134 19×12
http://hobbyking.com/hobbyking/store/uh_viewItem.asp?idProduct=9135 19×10
http://hobbyking.com/hobbyking/store/uh_viewItem.asp?idProduct=8158 20×10
The 20×10 might be too big but i’d try it anyways. On the 19×10 wide open i think we’re only pulling like 65 amp – there’s more there in the motor and esc. Every single time we feel the motor and speed controller it’s cold after flight, the batteries are barely warm to the touch after hard flying.
8. General Notes
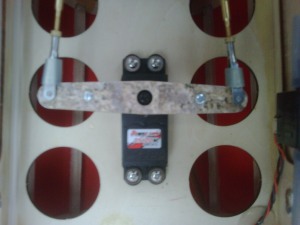
Rudder Servo Arm: The rudder is a pull pull configuration. Brent insisted on custom fabricating a servo arm. The length of the arm is intended to the be same distance as where the pull pull wires attached to the rudder. Brent wanted them crossed inside the fuse – this way there is no slack in the pull pull when performing maneuvers.
Getting the CG right: Since we were light on batteries the CG wasn’t right. We had to add 7 oz of lead in the cowl to get it to balance. This is why i think it will be safe to go with bigger batteries. You will still need to add weight in the cowl, but it will be less. See this note https://flyingelectric.wordpress.com/2009/12/20/added-about-7oz-of-shot/#comments
Servo Spacers: The split stab servos are a tad too big to actually fit properly in the fuse. The guys that were helping me put this together shimmed the servos. This might be reason to consider a different servo perhaps not as deep.
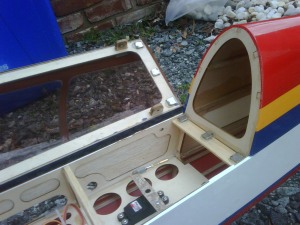
Canopy conversion: Electric power systems are a lot more dangerous that their hydrocarbon counterparts because you dont really know if it is live or not. Its very important that the power system be rendered safe when not in flight. At these amperages you cant really effectively use a power switch – you can either unplug the battery or install a short plug. For us the simplest thing to do was to make it very easy to get inside to unplug the battery – and the way to do that is with magnets.
We had to build the shelf in the fuse to glue the magnets on to. Once we got the shelf height set properly we simply glued the magnets on the deck and on the canopy. During some extreme snap rolls Daniel was able to pop the canopy off. The plane flew fine without the top on as Daniel was able to land it. You’ll want to make sure you use rare earth magnets. I have some in inventory I would donate to anyone in the club converting their AeroWorks to electric. We will be adding another magnet to our setup soon. AeroWorks includes includes some ultracote for pathing and repair work – which we used to cover the 4 screw holes. We intentionally kept the canopy where it would be easy to revert to screw-on in case we changed out the power plant for gas or nitro later.
Summary: I’m new so my comments don’t really count a lot – but I had the help of some real experts in the field. Brent recommended this plane to begin with, and the others that were involved in the build were impressed with the quality of the kit and that it included basically everything needed to get the plane in the air. Because we were converting to electric there was some extra time spent at the motor mount, getting the CG right, and converting the canopy to magnetic. I’m disappointed in the flight times and would definitely recommend bigger batteries. If you think you are going to go electric because it’s cheaper than gas or nitro – you would be mistaken. For about the same money you can get a quality gas engine I’m told. All and all if you are good with the flight times then I would strongly recommend this kit. As a new guy getting started in the hobby this platform offered the opportunity to learn a lot.

Leave a comment